|
DISCOVERING THE BLACK SHEEP |
|
|
This, my new Quadcopter, cost a few thousand shillings as you can imagine. About half the money went on 'The Black Sheep' Discovery and the other half on the Naza-M Micro Control Unit (MCU) and its associated GPS sensor. The quad kit, which I bought on eBay, came with the four black arms you see here, the two PCB plates, four each of proprietary motors, props, adaptors and ESCs. |
|
|
|
CONSTRUCTION Well this should be straightforward but in my kit the (soft metal) hex head bolts seemed to confuse me somewhat. Some were the wrong size and there were not enough of another size; in the end I got in touch with TBS and got a new set, gratis thanks to Trappy. You need to work out which bolts go where (plates, pillars and motors) before you begin, but given the correct bolts it all goes together nicely. One further word of caution—make sure you solder the pin headers for the connections between MCU and your TX on the correct side of the board. I made the mistake of getting it wrong first time round so beware. |
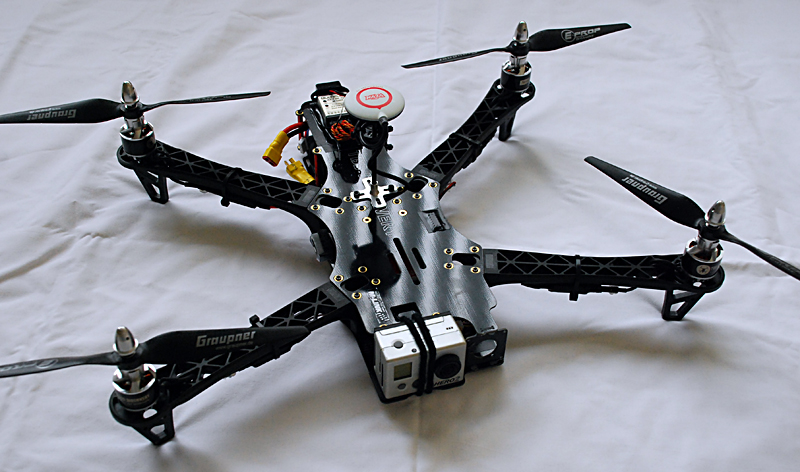
Something I regret not doing in my haste to get it all together is to BALANCE the motors (more on next page). These Discovery ones are 750KV and 26mm in diameter, they seem pretty good motors to me. They come with prop adaptors and conical nuts but I recommend you get some 5mm Nyloc nuts instead as these will not come loose. (Nyloc nuts are the ones with a polythene insert, you can just see one in the image here.) Conical 'nuts' have been known to come flying off of their own accord. ESCs The TBS ESCs are ready flashed with the SimonK firmware. This is something one can do oneself with most ESCs but it is a delicate thing to do and requires some level of competence in PCB soldering etc. It is simply, as I understand it, a firmware upgrade to enable the ESCs to perform faster than usual manufacturer's output parameters. This is useful when you have a quadcopter and want a rapid response from your motors close to the ground and not so important when flying aircraft at a distance. Anyway, it's already done which is good. The TBS ESCs are designed to run at 30A which is a bit of overkill since I doubt you are never going to reach even a third of that current draw on any one motor. PROPELLERS The Discovery will operate on props from 8" to 10". Inexpensive plastic ones have been known to break in mid-air and with up to £1000 hanging on cheap props it doesn't make sense. Graupner e-props seem to be the popular choice at the moment; either the 5mm bore 9" x 5" or the 8mm bore 10" x 5" work well. My motors have 5mm shafts so I chose the smaller of the two. Remember the 8mm will require an insert and these are £1 each! Four ten inch props will cost you a pretty penny, somewhere around £30 if you can still find them (Graupner filed for bankruptcy protection in February 2013). |
|
|
BATTERY I chose to use a 4S 3300 mAhr Lithium Polymer battery from Hobby King in China. I opted for the Turnigy Nano-Tech series. 3000mAhr will suffice and the Discovery quadcopter may even fly on a 3S Lipo battery; I haven't tried that so I can't say. You should expect to get flight times of around ten minutes with this 3.3Ahr pack. I also bought a Zippy Compact 3700mAhr for comparison.
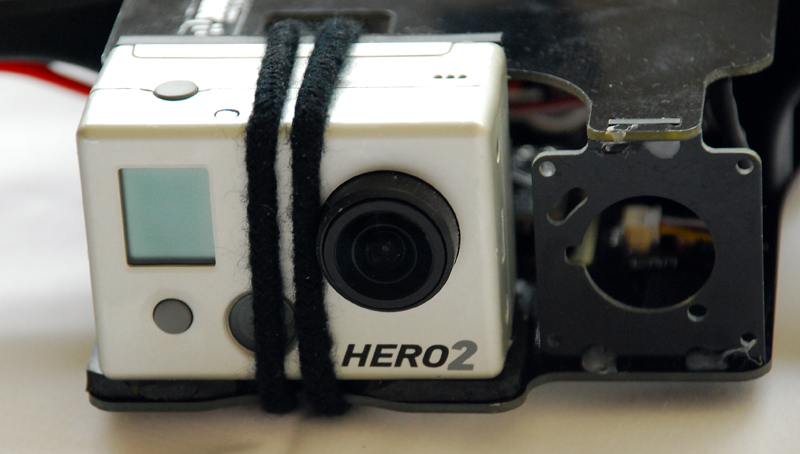
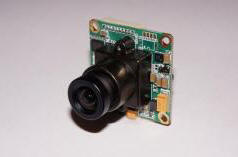
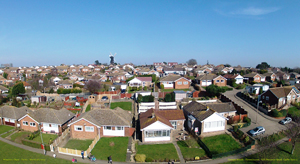
CAMERAS You've probably already researched this quad if you are reading this article but I can briefly say that the TBS Discovery is specifically designed to carry a GoPro HD camera which fits on the front of the quad bottom plate. This is the reason why the front arms are canted back... the GoPro has a very wide angle field of view of 170º... canting the arms removes the propellers from the camera's view (well, almost). This can be removed in post production using GoPro's CineForm Studio. FPV CAMERAS
|
|
|
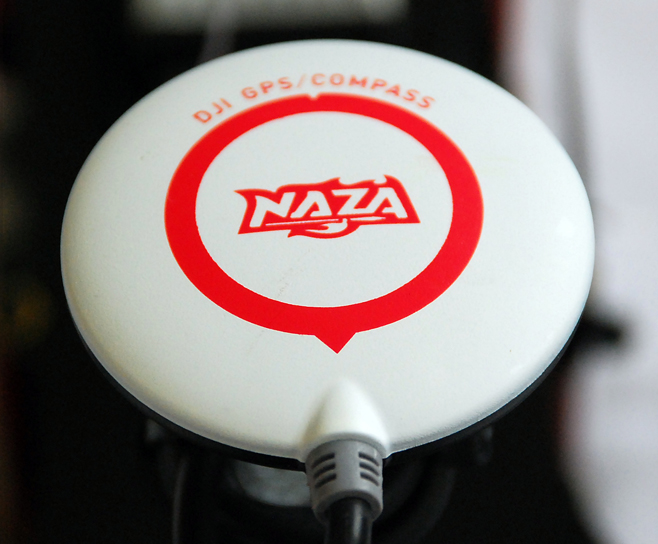
The micro control unit from Naza is rather clever. You can go on their website for more information but simply it has a 3-axis gyro and accelerometer and, coupled with GPS/compass unit, provides a number of features: GPS stabilisation, attitude hold and manual control plus course lock, home lock, return home and a battery voltage failsafe system. Not forgetting a gimbal control for an FPV camera with a pan and tilt mechanism. NAZA SET UPThe manual kind of explains everything, albeit with a Chinglish bent. You need to register with the site and then download the Naza Assistant and the user manual and install the drivers on your PC before you can get anywhere. If you got as far as buying all this gear then you probably have a good idea of how it all works. Trust me though when I say you have to be completely conversant with your own make of Radio gear. In my case this is Multiplex M-Link on 2.4GHz retro-fitted to a Profi 3030 dating back to the late eighties. Setting up can be problematical. |
|
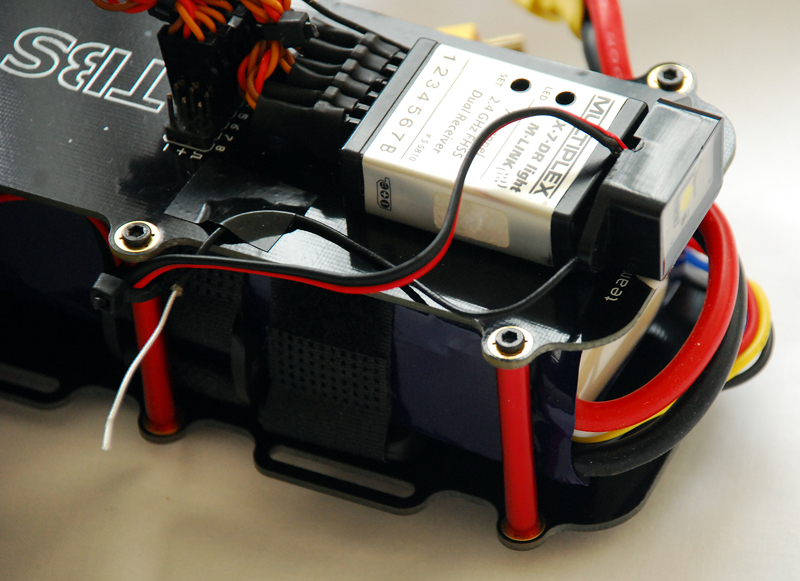 Ideally you will need a radio with the four 'regular' functions function of ailerons, throttle, elevator and rudder plus extra channels for two 3-position switches and one 2-way switch. (Six channels effectively.) and another two for the gimbal servos. You will have to download the User Manual, Drivers and Naza Software Assistant from the Naza website before you can get anywhere. You may need to upgrade the firmware as well. Go here: http://www.dji-innovations.com/products/naza-multi-rotor/downloads/ TIPS & TRICKS As I said above, make sure you solder the PCB pin headers on the the correct sides of the plates. Sort out the hex head bolts before you install them. They have soft heads, btw, and are easy to damage! Accurately the measure the MCU and GPS distances (mine are -6cm and -12cm respectively) when you install the units. Counter intuitively, the Naza GPS text on the antenna (above) does not point towards the front of the craft, it's the cable points to the front! Tie down all loose wires etc. as anything loose can cause vibrations which you do not want. Importantly, though simple, check that the motors rotate in the correct direction and that you have the correct propellers at the correct positions. It's so easy to get it wrong, even when you have done it so many times before like I have! Balance your cheap plastic props but Graupner e-props are very close to being balanced. Beware the plugs on the ESCs as they can cause intermittent contact—either solder ESCs and motors together or, as I have done, use a spot of hot glue to hold them in place. Unlike me balance your motors! I strongly recommend you search YouTube for 'H76 Industries' series of 30 videos on creating a Discovery machine such as I have here. |
|
| JELLO !
This is the term the Americans call that
'wobble' you get with video when vibrations from unbalanced motors
and propellers get through to the camera. It's very easy to get but
it is so hard to get rid of it! The best solution seems to be
mounting cameras something called Sorbothane. It's a kind of
synthetic rubber that helps with vibration. It is expensive
though... a piece 100 x 100 x 3 mm will cost you £7. It is used to
remove vibration in audio speaker applications, for auto-rotating amateur
telescopes, etc. and even insoles for trainers/shoes. You can just
see it on my image on the GoPro above. That's a girls' elastic
scrunchie from the Poundshop holding down the camera. Google or eBay
Sorbothane. Align Trex Helis do another substance for
anti-vibration, a P Other things that some people use to try to reduce/eliminate vibration are mounting cameras on the foam earplugs suitably cut down in half, on any type of soft foam or silicone rubber and also popular is Moongel used by drummers to modify or dampen? the sound of their drums. One other thing worth a mention is to shoot video in 50 or 60fps and then reduce it to 25 or 30fps in the edit. GoPro's CineForm Studio editing program does this really well. For me, with a Hero 2, this means shooting at 720p rather than 1080p but the latest GoPro Her03 Black Edition will do a high frame rate it at higher resolutions. |
|
| VISIBILITY One thing which comes as a surprise as a first timer on quadcopters is visibility and orientation. You may think all those flashing, coloured l.e.d.s are just bling but they are not. You certainly need something in order to see which way the craft is oriented, remember is it a silhouette against a bright sky and the TBS black arms don't really help. At the moment I'm using a high brightness flashing white l.e.d. from Halfords (mounted at the rear of my receiver) which seems to work up to about 50 metres in bright daylight. Luckily, if you get in real trouble with the Naza + GPS system there are two solutions... the Return Home function or the Home Lock function. More about this another time. BALANCING MOTORS This is generally done using a small piece of insulating tape stuck to the outrunner drum. Surprisingly, a useful tool here is an Android phone or iPhone, or even an iPad. Find a free Seismometer App and run each motor on the bench in contact with your Smart Phone. The 3-axis accelerometer in your Smartphone will show the vibrations on its screen. Moving the tape by a few mm at a time round the drum can help to 'balance' a motor. See next page... |
|
|
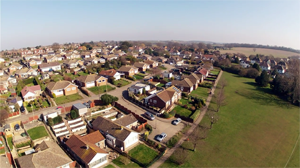
The weather wasn't that good in early March 2013 so the quality isn't that good on some of the footage. None of my props nor motors had been balanced, there is Jello but it's not too bad. It was rather windy at times hence the occasional wobbles. These videos were mostly shot at 720p and 60 or 50 frames per second reduced to 25fps so some of it appears in slow motion. I put these together hurriedly but I am pleased with my footage overall, it can only get better. |
|

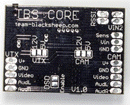 My kit also contained a CORE
which is a voltage supply cum regulator PCB giving 5 volts and 12 volts
for TV transmitter (VTX) and FPV Camera/On Screen Display (OSD) units. (It
retails at about £60 on its own and is generally only required for
FPV). The kit came with sundry bits and pieces and four cheap 10" x
4.7"
plastic props which I promptly replaced with four Graupner
9"x5"s. To complete my quad package you can see, in the red
boxes, the sophisticated Naza control and Naza GPS units. I got
these direct from China.
My kit also contained a CORE
which is a voltage supply cum regulator PCB giving 5 volts and 12 volts
for TV transmitter (VTX) and FPV Camera/On Screen Display (OSD) units. (It
retails at about £60 on its own and is generally only required for
FPV). The kit came with sundry bits and pieces and four cheap 10" x
4.7"
plastic props which I promptly replaced with four Graupner
9"x5"s. To complete my quad package you can see, in the red
boxes, the sophisticated Naza control and Naza GPS units. I got
these direct from China.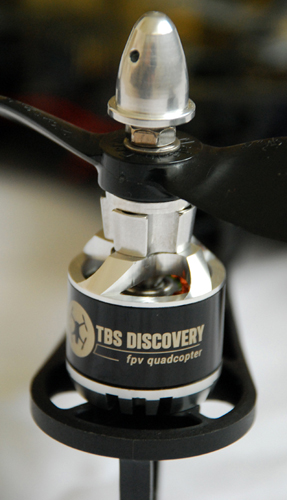 MOTORS